Hello Creative Types, and Welcome to my first blog ever!
I want to share with you my materials and techniques, as well as a word on the cost and feasibility, for the various fun art projects and other hair-brained ideas I’ve participated in. This first project was for a competition held by the Maritime Aquarium in Norwalk, CT, called their “Festival of Lighthouses”. For the past 11 years the Aquarium has drawn visitors during the holidays to admire the wildly creative works of lighthouse builders. This was my entry in 2011.
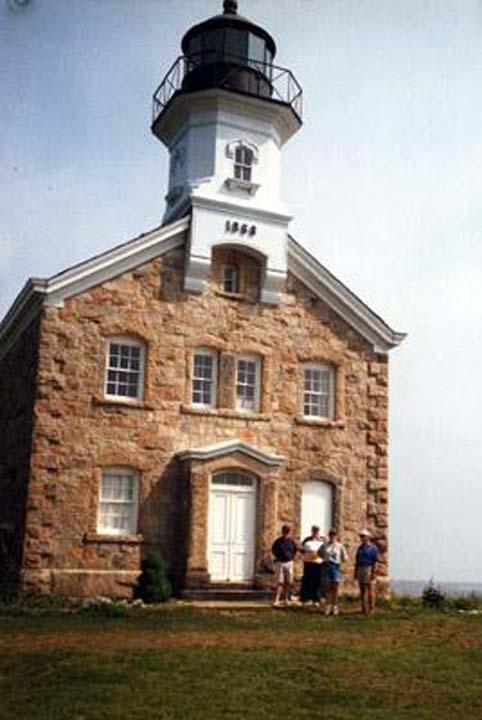
When I read about the competition, this is the picture that immediately popped into my head: The Sheffield Island Lighthouse, with its golden brown-colored granite blocks, was a natural to be made out of sugar cookies (rather than gingerbread, which would have been too dark).
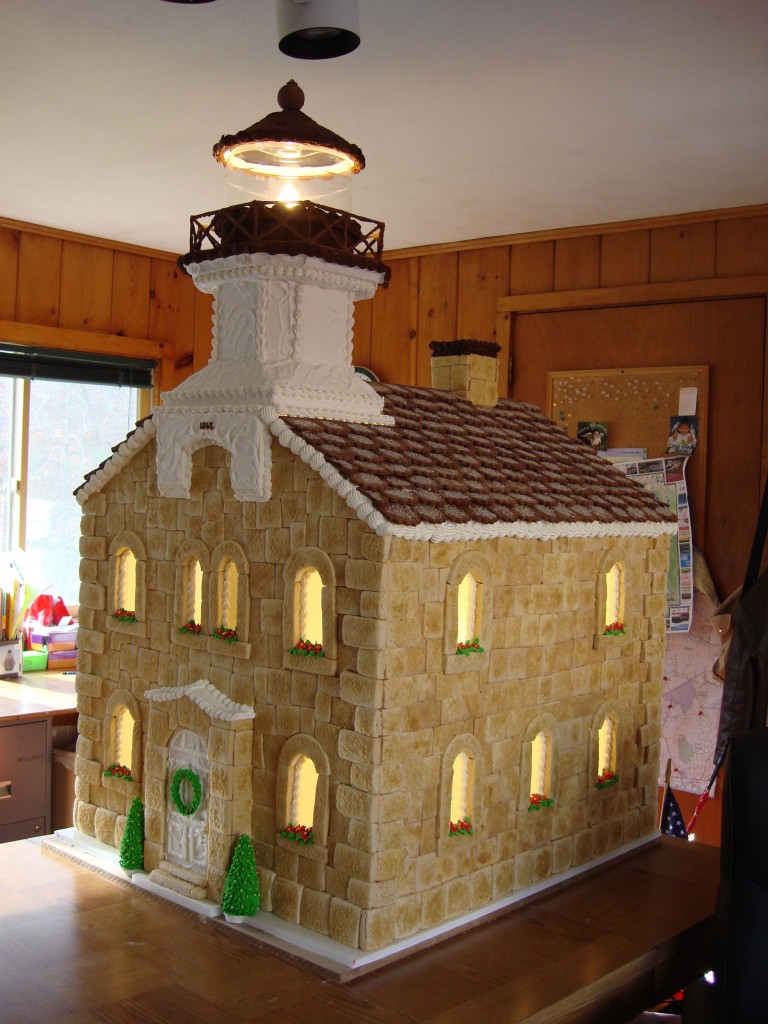
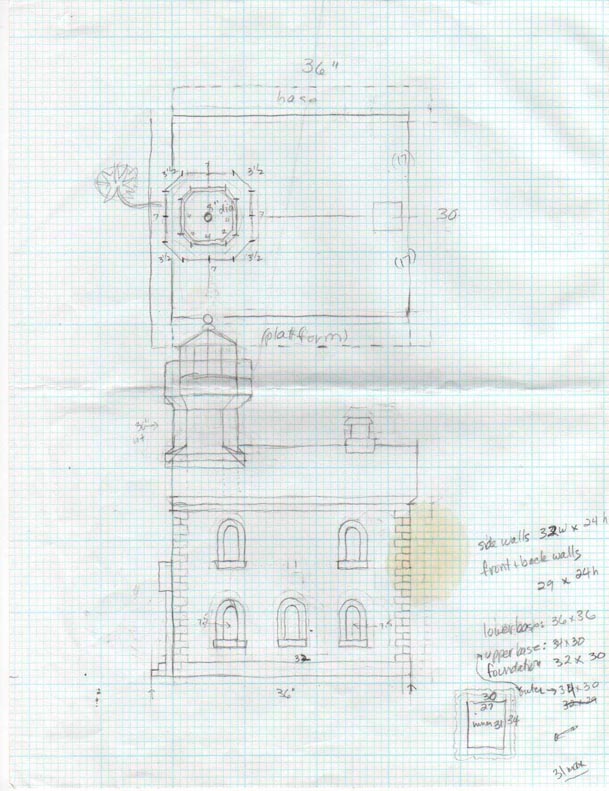
Where to start? Graph Paper: I always start with a pencil drawing on graph paper to get my overall dimensions looking right. A top view, front view, side view, rear view, and any details like the light tower. Many ideas and solutions come to you as you’re drawing. I knew from previous experience that the way for this to be sturdier than it looks, and survive moving and car rides, was to use half-inch thick foamcore for the armiture. Not every craft shop or office supply place carries the half-inch foam core, so it required a trip to the terrific art supply store in Norwalk, Jerry’s Artarama to purchase large 40″ x 60″ sheets. So, armed with a sharp X-acto knife, a cork-backed ruler, my graph-paper measurements, and a hot glue gun, I cut the foam core pieces and glued them into the house shape. You can see the white foam core base in the photo above–there was a second flat base piece inside the walls, for added strength at the bottom, and also for the walls to line up against.
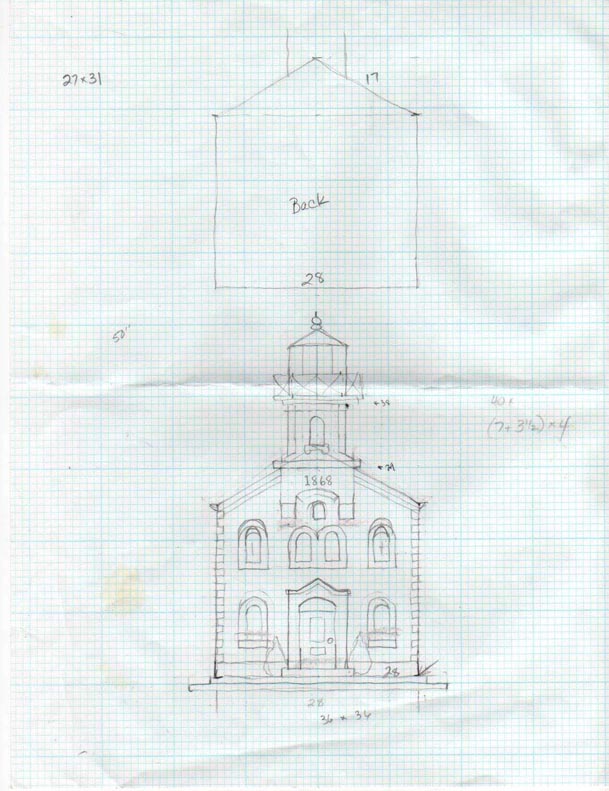 Important Things to Consider During the Design Stage: This may seem obvious, but while you’re in the design stage, be sure to take into consideration the size of your DOOR, so that whatever you’re making will be able to exit the building without the use of a sawzall!
Vocabulary: As you’re considering colors, textures, recipes, trim, etc., come up with a “vocabulary” to work within and constrain your choices. Too many candy/cookie projects are ruined by overenthusiastic candy gloppers who want to try a little of everything on their project. Restrain yourself!
Deliciousness: Keep in mind that, while your cookie house may not actually be edible, it should always look that way. I once saw a fabulous creation that was ruined by the use of grey icing! Too many bright colors can also ruin a piece. Appealing colors for baked goods should be PASTEL, white, golden brown, chocolate, etc.
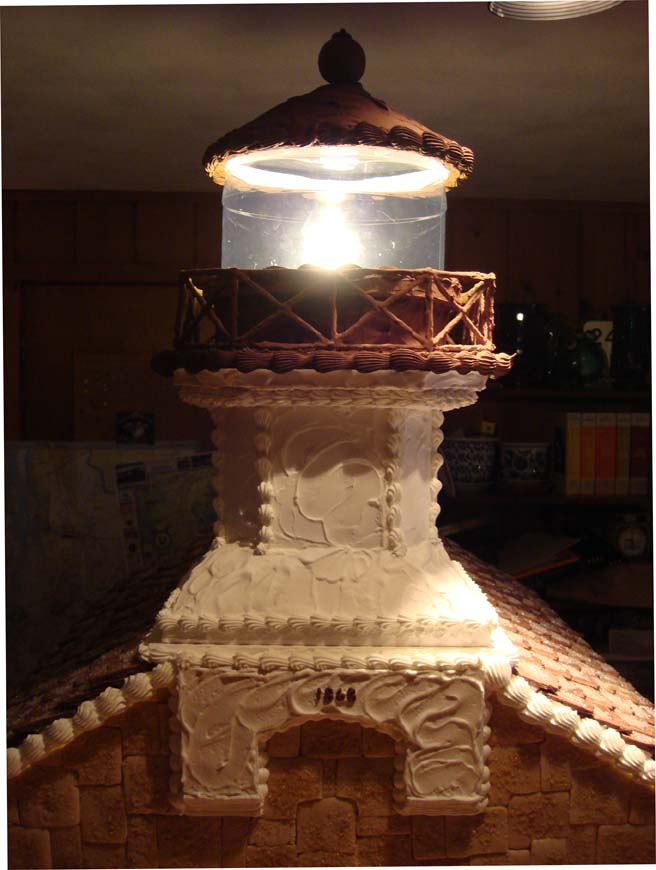
The Light “Housing”: Also inside, is a simple structure to support the light tower–a four-sided column of foam core with a piece at the top with a 1-inch hole in the center to hold the electric light bulb socket, and a hole at the bottom for the cord. There is also a similar smaller box to support the second light which lights up the windows. Both light bulbs were small, 25-watt compact flourescent bulbs, shaped like a “flame” or teardrop. These were perfect as they gave off almost no heat, so I didn’t have to worry about it melting the icing above or setting the cardboard on fire 🙂 The clear outer “housing” for the bulb is a big plastic jar, 8″ diameter, the type which comes containing cheese-puff balls. I only ate half of them, as my son wanted the other half (what artist doesn’t sacrifice for his art?). I turned it upside down and had it rest in a ring/well of foam core, so that it could simply be lifted off to change the light bulb.
The Railing: To make the chocolate railing, I cut the pieces out of small diameter wooden dowel rods, and hot-glued the whole railing together, having lined up and poked holes in the foam core floor. I then turned the whole railing piece upside down and dipped it into a big bowl of chocolate royal icing to coat it. The consistency of the icing was soupy enough to dip, but firm enough not to drip off. I immediately put it back into the pre-poked holes and let it dry there, in place, so it wouldn’t crack if dried and put in later. I also dipped into the bowl of icing, a 2-inch diameter wooden craft ball with a wooden dowel hot-glued into the hole at the bottom, like a lollipop. The stick was then put through the hole in the center of the cone-roof, ending in a hole drilled into the top of the clear plastic housing. This supported the weight of the ball. A single icing star was piped on the tip-top of the ball.
The Pinnacle (of stress): Hot glued to the top of the clear plastic cheese-puff light housing is another ring of foam core. Glued to that, to form the cone-shape roof, is a piece of thin, flexible cardboard “manila” folder. I cut it into a circle with a small hole in the middle, cut a line from the hole to the outer edge, and overlapped it til it gave me the desired angle of cone. Hot-glued into place, I then spread the chocolate royal icing over it, TV commercial-style, spreading the thick, smooth waves into curly-cues and swirls of sugary carbo-liciousness. Funny story: Remember the “October Suprise” snowstorm of 2011? Where eight inches of heavy, wet snow fell on trees that had not yet lost their leaves and so snapped under the weight, falling across roads and power lines? Where hundreds of thousands of people in the Northeast lost power for upwards of 7 days, in the cold? And Halloween was cancelled? Well, it was all day during that storm I was working on this chocolate icing part. I was piping the chocolate shells onto the rim of the cone-roof, just waiting for the lights, our heat, our beloved running water to go out, which, at 7pm, it did. Over the next few days I tried continuing to work by lantern and candle light, but it was futile, with all the other difficulties of the time, such as dealing with the large tree branch that fell on my car and cracked the windshield and sheared off my rear-view mirror, and blocked the driveway til someone with a chainsaw could come, chainsaw owners being in short supply. I even had a friend bring her Kitchenaid mixer to another friend’s house where people were coming to have showers, hot food, and charge up gadgets, so I could whip up a bucket of royal icing. But it was really inconvenient working in the cold with bored kids around, so I gave up. On day 4 we got our power back. Fortunately, the good people at the Maritime Aquarium understood the dilemma, and gave us all an extra week to finish.
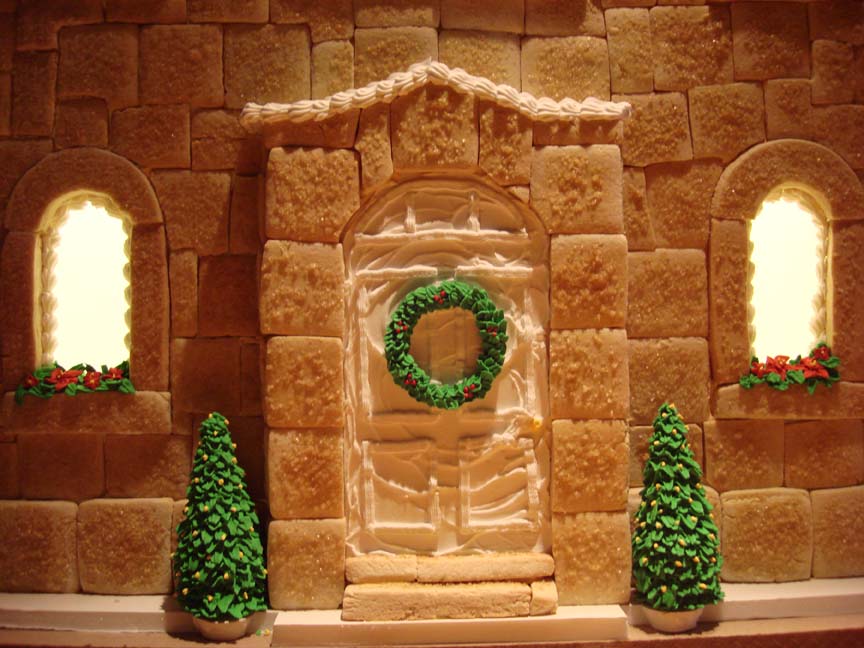
The Granite Stonework: I knew that the sugar cookies would have to be baked by hand for several reasons. First, sturdiness. To make cookies that last, and last, and last, and don’t break even if you drop them to the ground from eyeball-height, here’s what you do: Start with a traditional sugar cookie recipe, cut back on the butter a bit, add some extra flour, and bake at a low temperature for a long, long time (see Recipe at the bottom of this post). These tasted fine, they were just as hard as, well, granite. (You can build cookie houses using store-bought cookies, but just expect lots of crumbs, crumbling, a shorter shelf life, and cookies falling off. ) I also wanted to try to replicate the granite stonework of the building, which was thicker on the base, the corners, and the window surrounds than on the rest of the walls. I used a square cookie-cutter for the squares, and a piece of cardboard cut to shape for the arches, posts and lintels. I also employed a baking friend, Laura, who didn’t know what she was in for, to churn out the cookies for me because of time constraints. To her lasting credit, each batch was mixed, rolled, cut, and baked to perfection, experimenting along the way. Fabulous job, Laura!
The Sugar: I used coarse raw sugar to look more granite-y. At first we tried baking it on to the cookies, but as soon as we stood them up on their side, half of the sugar fell right off. I then experimented with maple syrup, karo syrup, egg white, and egg wash to see what held up and looked the best. The egg wash won, so after baking, each cookie was quickly painted with a dollop of egg wash (an egg white and yolk mixed together) and the raw sugar sprinkled on and allowed to dry.
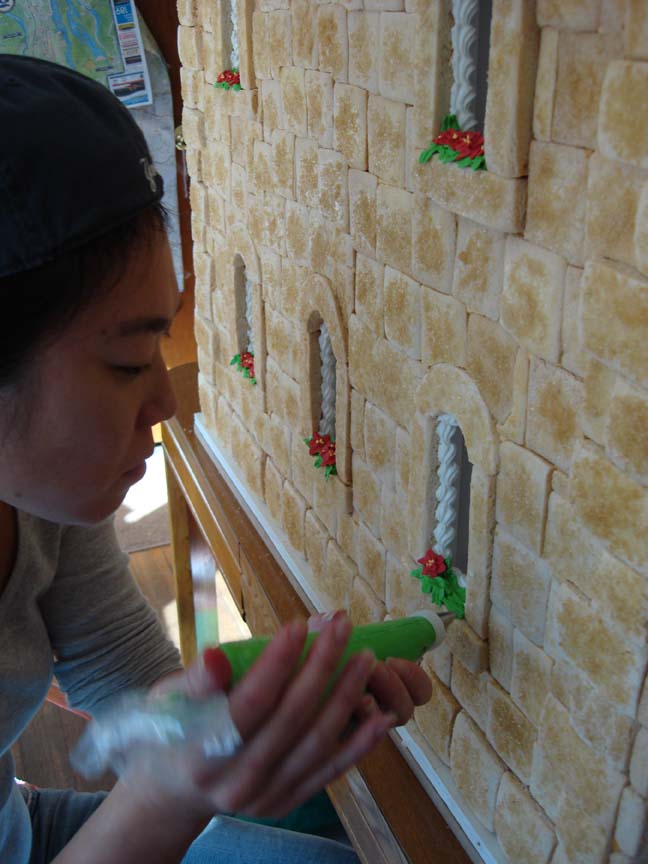
Applying the Stonework: Starting at the bottom and working upwards, I piped or spread a dollop of royal icing on the back of the cookie, and stuck it on. The time-consuming part was sculpting each cookie into its puzzle-shape with an X-acto knife, shaving all sides to make them butt together snugly. No “mortar” showing on this project, sorry, but the final effect is well worth it!
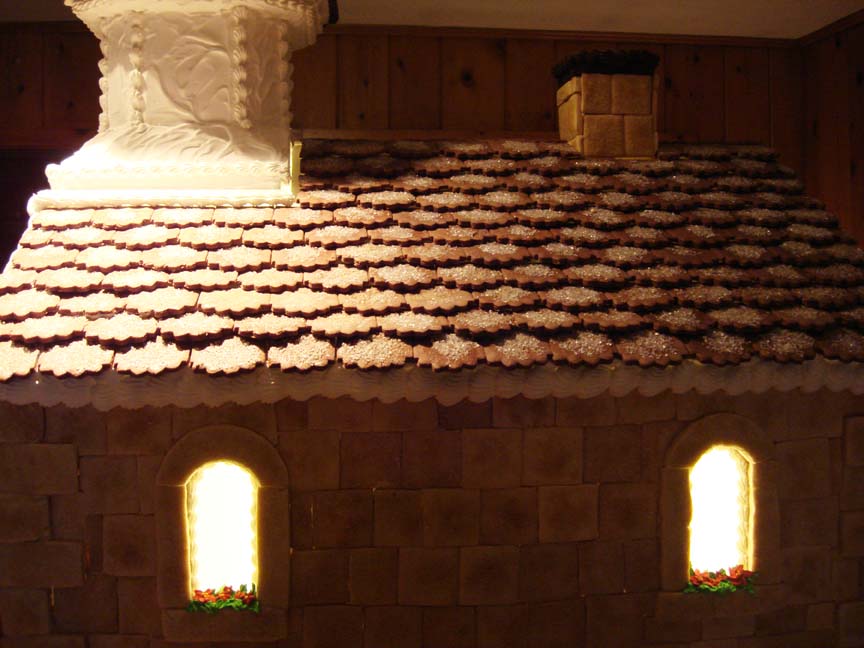 Chocolate Sugar Cookie Shingles: The roof shingles were made using the same cookie recipe, but about a cup of cocoa powder added. They were rolled relatively thin, and the scalloped edge cut with a cookie-cutter and a knife. Coarse white sugar was used to make them sparkle. The shingles were laid from the bottom row up, and the rough edges at the apex of the roof covered up with a row of chocolate icing shells.
Icing Details: The white icing details were piped with ordinary piping bag and star tips. The little green trees were piped with the leaf tip onto a styrofoam cone. The wreath was piped directly onto a sheet of waxed paper with a circle drawn on it for a guideline, allowed to dry, then peeled off the waxed paper and icing-glued into place. The beautiful red pointsettias were also piped with a leaf tip onto waxed paper and allowed to dry. The greenery was piped onto the windowsills, then the dried red pointsettias were placed on the wet greenery to dry.
Royal Icing: This icing is key to lasting decorations. It dries hard, and I’ve used it on projects that looked great twelve years (no exaggeration) later as I was taking it to the dump! However, it is a grease-less icing, and any trace of grease in what you’re gluing will break it down, causing storebought cookies to fall off prematurely. They will stay on for a while, but I wouldn’t trust the relationship to work beyond two weeks.
So, was it worth it? Even though I subscribe to the “If it’s not labor-intensive, it’s not worth doing” philosophy, I also have a practical side. These two sides of me fight it out all the time. Here are some “fun facts” for this project: The cost of 35 lbs. of flour, 25 lbs. of sugar, 4 dozen eggs, 13 lbs. of butter, 15 lbs. of confectioner’s sugar, plus the cost of the foam core, hot glue, and electrical bits, came up to about $400. The prize money for first place was $1,500. Which sounds feasible, until you consider the 186 man-hours my friend and I spent. So we worked at a rate of $5.90 per hour, for a lucky first-place award. If we had come in 2nd place, we would have been working for $1.88 per hour. Third place and we would have been in the hole. Having said that, sometimes the payment comes in the form of achieving your vision, or the “oohs and ahhs” from the kids and parents while on display. Was it worth it? You bet it was!!
Afterward: After the lighthouse had been on display for two months, it was moved back to my studio for some re-working with the intention of having it on permanent display. About a dozen cookies had fallen off (no doubt because of the butter in the cookies) but I re-glued them with hot-glue. I checked the rest of the cookies for stability. Then I sprayed the whole piece with clear gloss acrylic spray. It took away the sugary-smell, which hopefully will keep little critters away. I’m not sure of the long-term effects of the acrylic spray coating on the cookie and icing surfaces, but so far so good.
By the way, here’s a photo of the real Sheffield Island Lighthouse. It’s a 30-minute ferry ride into Long Island Sound from Norwalk, CT, and a delightful small day trip with a tour of the period furnishings and history.
Hard-as-Granite Sugar Cookie Recipe:
1 stick butter (1/2 cup)
1 cup sugar
1 egg
2-1/2 cups flour
1/4 teaspoon salt
1/2 teaspoon baking powder
Blend wet and dry ingredients independently, then together with heavy-duty mixer. Knead by hand when your mixer motor starts to smoke. On parchment paper, roll out dough to desired thickness, cut out shapes and remove the “negative” area dough. Then slide the parchment paper onto a baking sheet. For 1/4″ thick cookies, bake at 280 degrees for 40 minutes. For thicker, 3/4″ cookies, bake at 280 degrees for 60 minutes. The long wait is an inconvenience when you’re used to the 10-minute cookie baking time, but oh well, that’s what it takes.
Royal Icing:
1 lb. confectioner’s sugar
3 tablespoons Wilton meringue powder, OR 3 egg whites
1/3 cup warm water
In a heavy-duty mixer with the whipping attachment, beat together for 7 minutes on medium speed. The icing will double in volume. For stiffer icing, whip more air into it. For soupier icing, add very small amounts of water at a time. Keep a damp towel over the bowl, or a lid on a plastic container to prevent drying out. If icing with multiple tips, keep tips in a wad of wet paper towel while not in use, to keep from drying and clogging tips.
Best of luck, and if you run into any problems, just phone Laura McGillicutty at 1-800-Just-Kidding.
I saw this Lighthouse at the Maritime Center in Norwalk – it was amazing! Great project for those serious about baking and architecture.