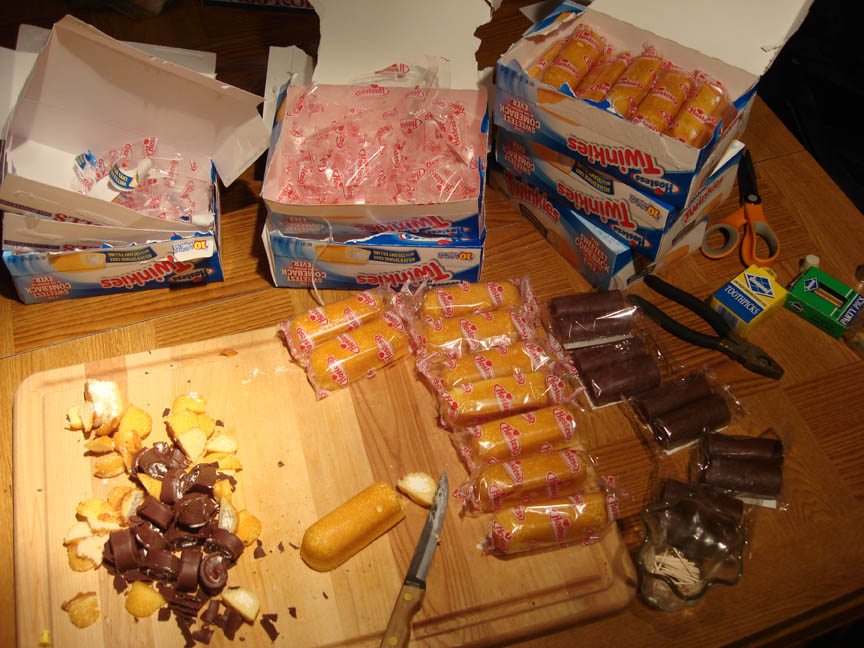
First, get a whole bunch of Twinkies!
There’s no use denying it, this part is a childhood dream come true 🙂 I had to empty the grocery store shelves of only two local grocery stores. A passing shopper remarked, “I guess you like Twinkies”, and not having time to explain, I replied, “Yeah–it’s my birthday!” Just messin’ with her.
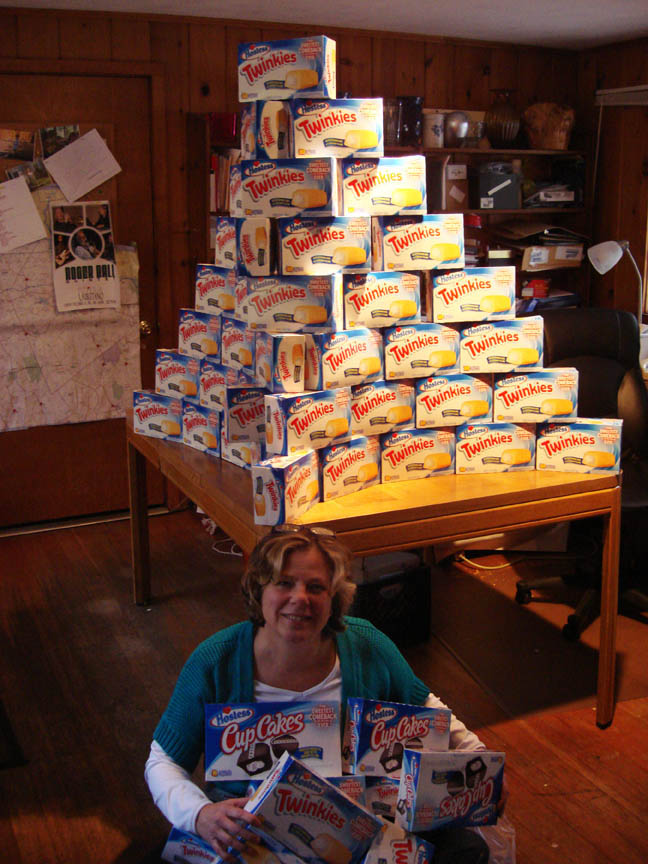
I had the idea to do a Twinkie lighthouse long before they went on the endangered-species list, and off again, earlier this year. This fun food sculpture was my third for the Festival of Lighthouses held annually at the Maritime Aquarium in Norwalk, Connecticut. It’s on display from Nov. 16th, 2013 through Jan. 20th, 2014 so if you live in the area, be sure to visit and admire all the wonderful, hand-created entries, and vote for your favorite!
As in previous posts, the intention of my how-to’s are to give you, creative reader, a general description of the tools, materials and techniques I use, so you can extrapolate from them when building your own versions of things, other structures and other “skins”.
So here’s the How-To:
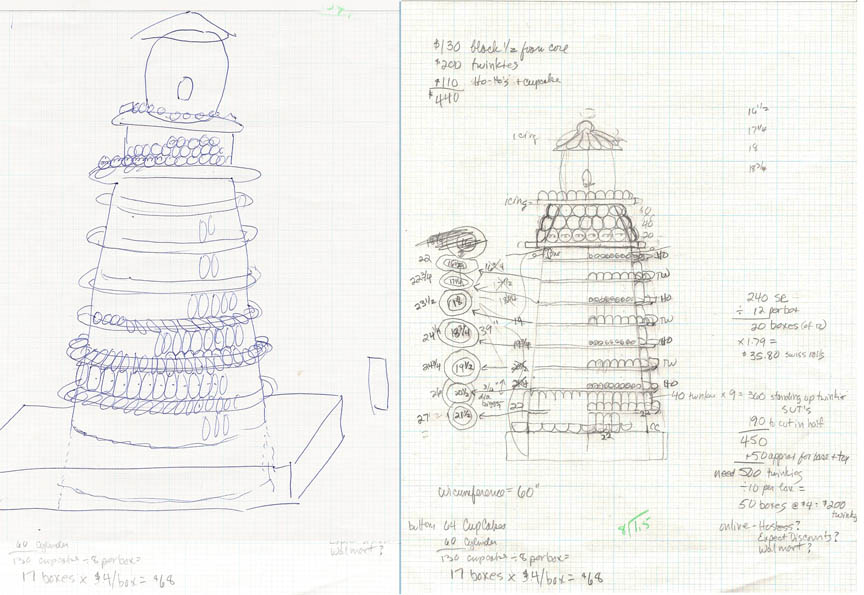
Begin with a simple sketch, translated into accurate measurements on grid paper. Make sure the overall size will fit OUT your door and INTO your car!
As before, my modus operandi is “goodies over foamcore armiture, glued with royal icing”. For the Twinkie design, however, the biggest consideration was that I would NOT be able to use royal icing because any trace of grease breaks it down. The Twinkies would fall right off. So, I had to design it around the fact that the snack cakes would have to either sit on a shelf, or be able to be held in place by other cakes or a bit of help from toothpicks. I couldn’t see another way around the problem–perhaps someone else can enlighten me?
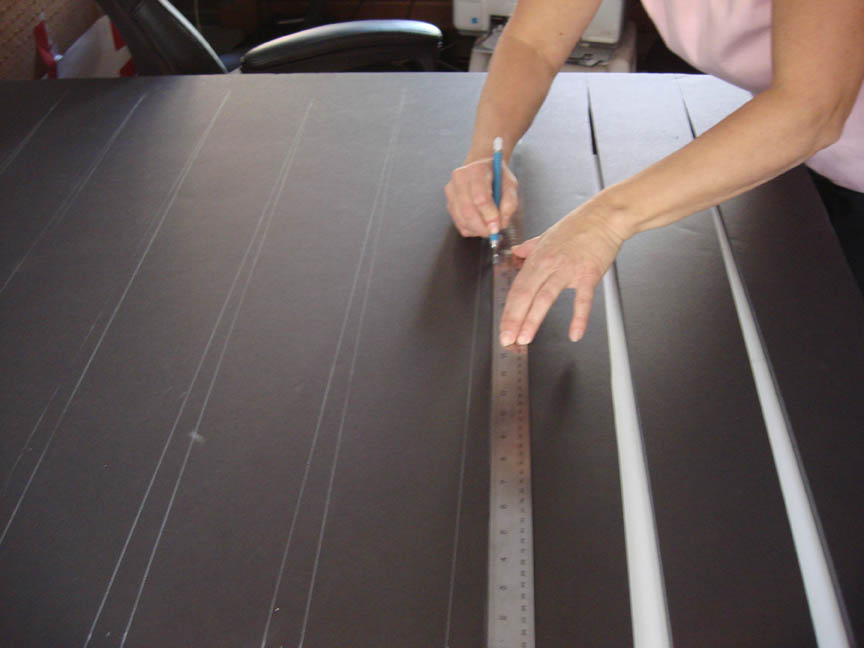
So when designing, keep in mind the sizes of foamcore sheets available. Half-inch thickness was essential for this. It’s a bit more cutting, but worth it for the sturdiness. Next I made the semi-annual pilgrimage to Jerry’s Artarama in Norwalk, where they have large sheets of 1/2″ foam core in stock–in Black!! I needed black because I wanted the foamcore support to disappear into the background.
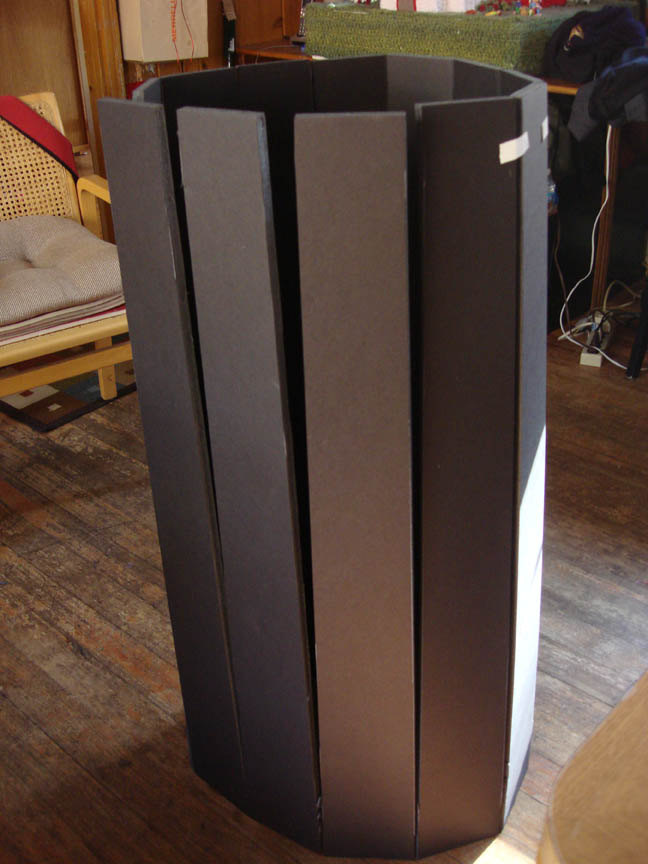
Lighthouses are cylinders that are broad at the base and taper as they go up. To make this shape, I cut narrow “V”s in the foamcore, being careful to leave it scored but attached at the bottom.
 a
a
When you stand it up, it pretty much falls right into shape.
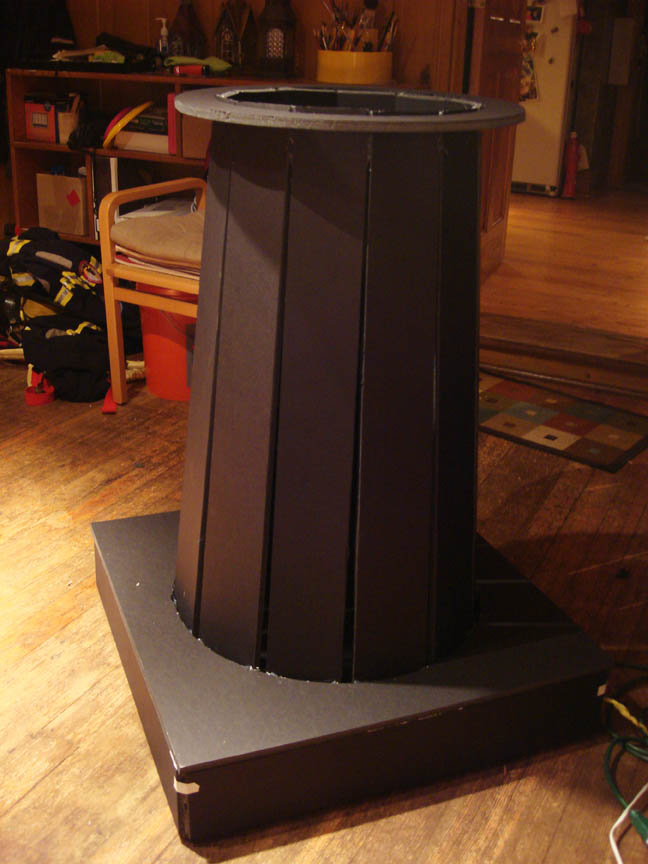
Then cut a ring to just fit over the top. It will coax the slats into a perfect circle. Also make a simple box for a base. Cut a hole in the top of the box for the base of the cylinder to go through. Leave out a couple of slats so you can get your arm inside to hot glue the bottom of the cylinder to the bottom of the box. Also hot glue the intersection of the cylinder with the top of the box. Hot-gluing at both of these levels should give the structure plenty of strength to hold up the tiers of weight you’ll be adding.
 a
a
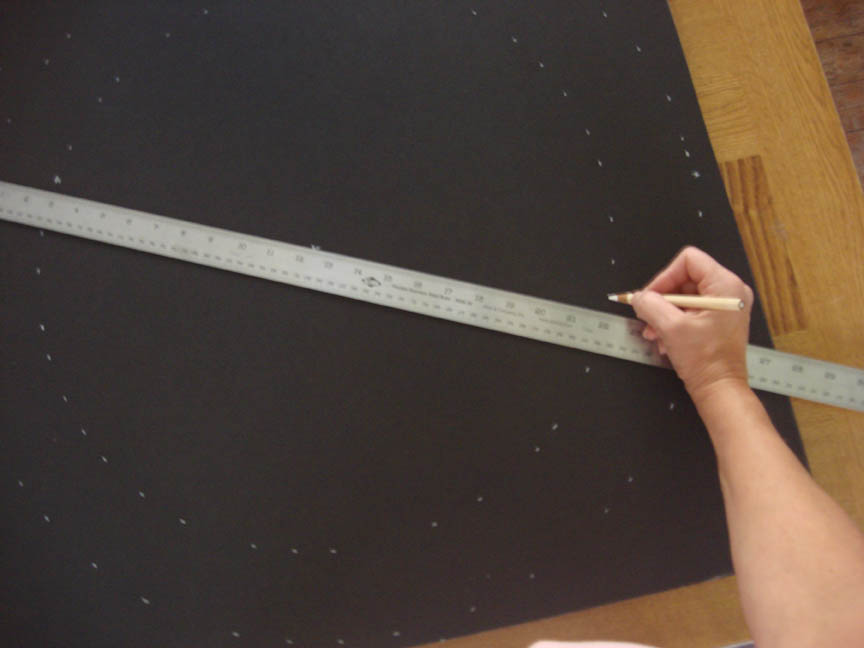
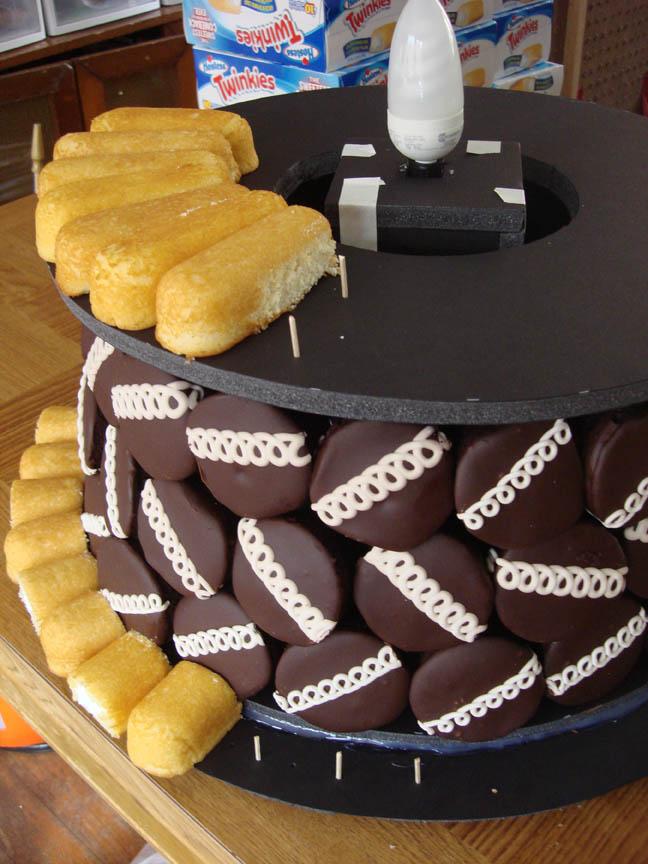
To make the tiers, cut successively smaller rings out of the same half-inch foamcore. I didn’t have a compass (or protractor?–I still get those two confused) for circles this large, and I didn’t trust a string-tied-between-pencil-and-thumbtack to be accurate enough, so I simply, and a bit painstakingly, measured the radii (speaking Latin now) with a ruler, marking with a pencil as I went around. Then I cut with an X-acto knife, connecting the dots with as smooth an arc as possible. I did invest in a gadget I found at Jerry’s, a foamcore cutter with a blade that you can adjust to cut a 45 degree bevel. This was because I wanted the shelves to disappear, as the Twinkies cantilevered slightly over the edge. You can see the effect of the beveled cuts below.
 a
a
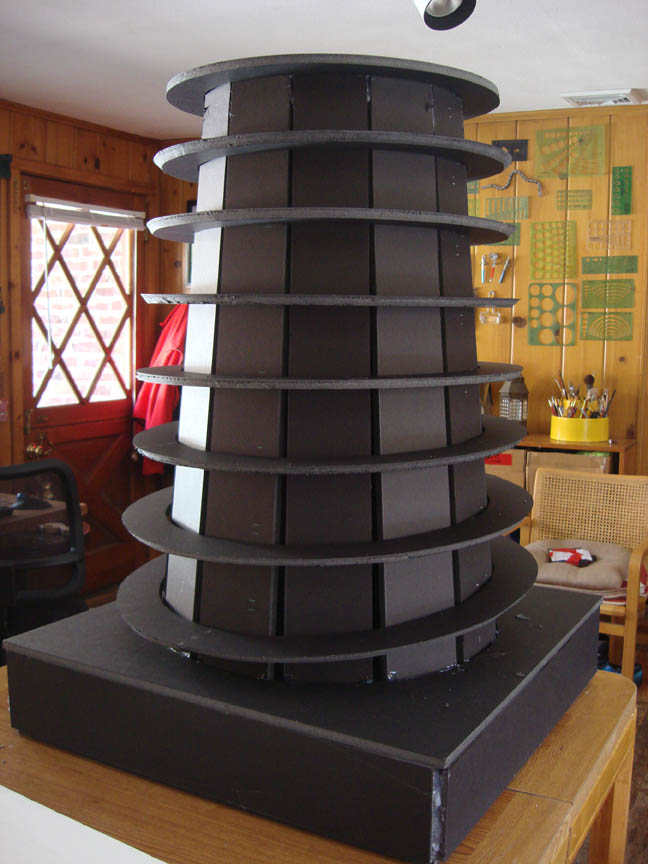
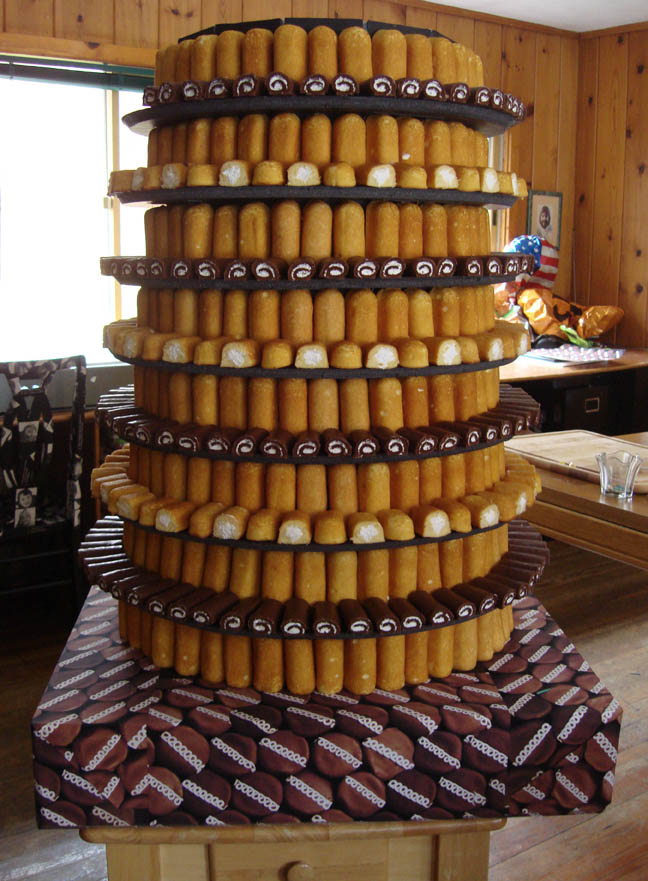
Getting these diameters right was probably the trickiest part of the whole project. Notice the topmost ring I left at 90 degrees. This was because I would be grasping the whole heavy top by this when disassembling to move. Measurements were important to keep fairly accurate. The height between shelves had to be just shorter than a Twinkie length, so that each Twinkie could be tucked in to help hold itself up. Notice that another good reason to taper the main cylinder, is that it will help hold up the graduated rings.

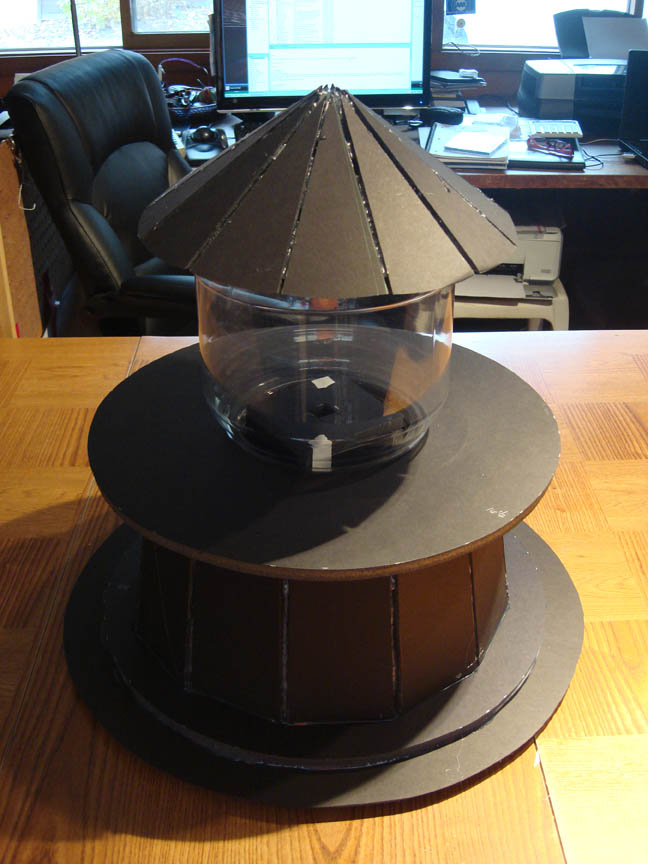
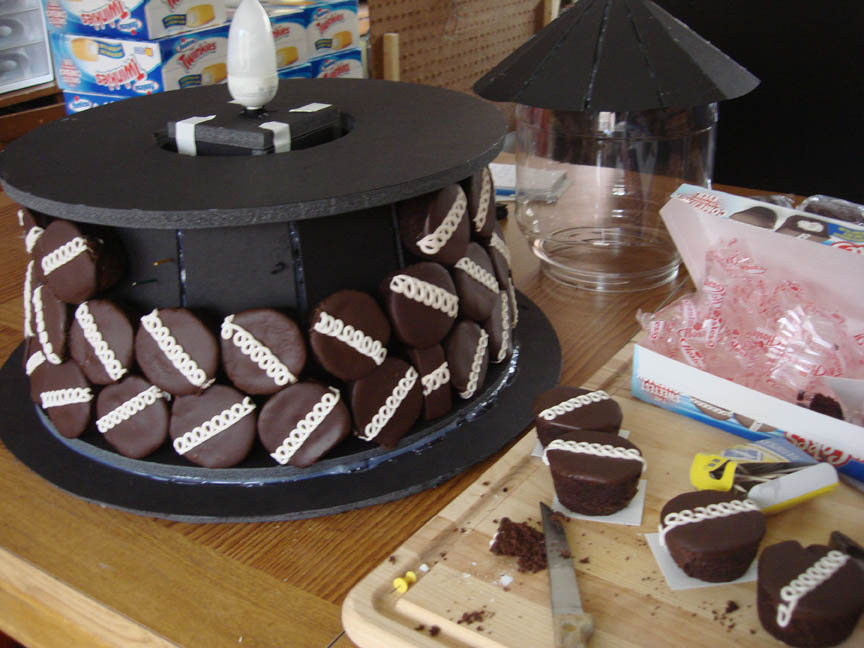
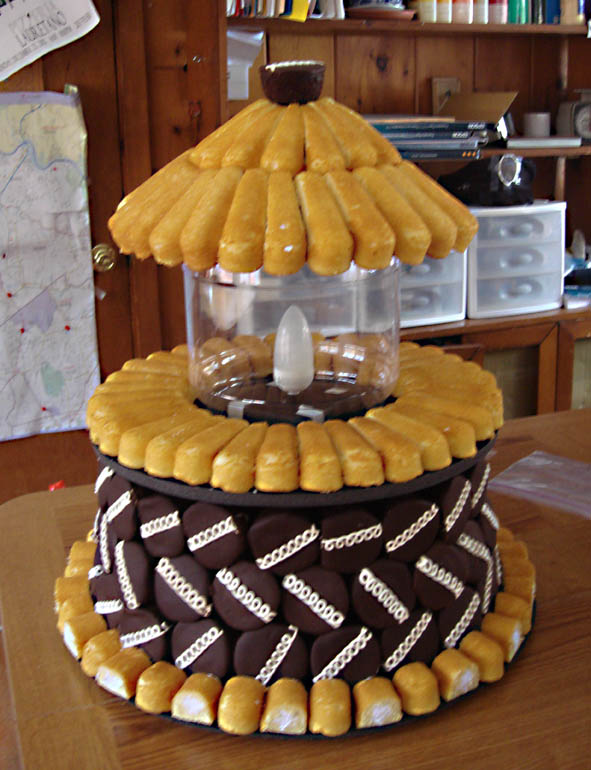
Here are the pieces cut for assembling the top structure. As you can see, the rectangular box will support the lightbulb socket, with the cord hanging down through the center. The box has to be narrow enough to just fit up inside the plastic jar neck, but wide enough to be stable. The bottom of it gets hot-glued to the bottom disc with the small square hole cut in it for the cord to come through. That disc, in turn, is glued to that first ring that fits snugly over the top of the cylinder (shown in the upper left of the photo below).
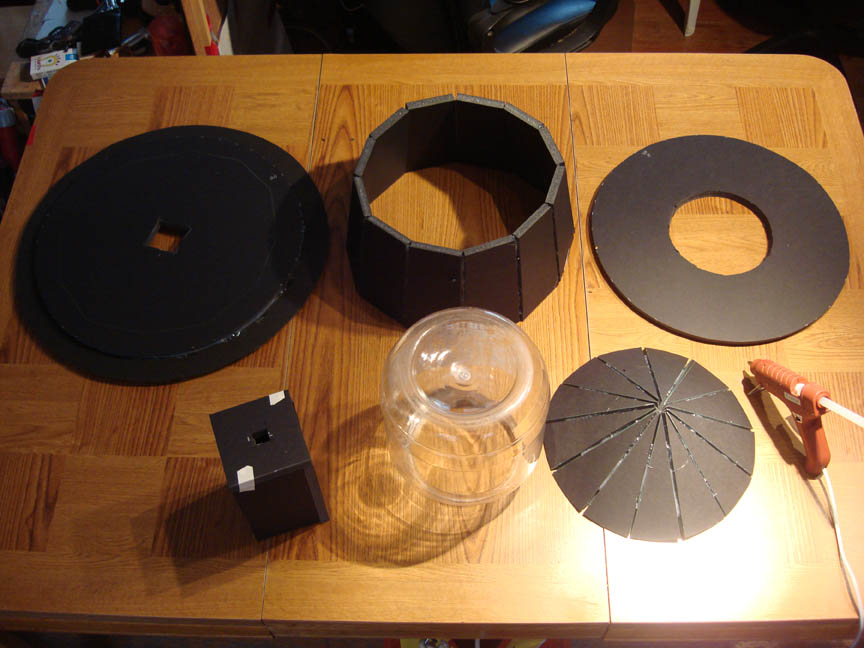
The smaller top cylinder which will support the cupcakes, is just a 7″ high rectangle, scored to roll into a cylinder. I also cut slender “V”s into this to make it taper slightly, so that the cupcakes would rest falling in a bit. The “hat” was similarly cut, a rectangle with a series of wider “V”s. While you’re forming the cone shape, temporarily hold the pieces together using Artist’s tape. If you’ve never used it before, I recommend investing in a few rolls. It’s a bit expensive at about $8 a roll, but well worth it. It’s very sticky, but comes off when you want it to without pulling up the substrate. I’ve had it on hand my whole career! In fact, if there are pieces you want to hold together but do not want to hot glue for access later, just hold it together with the Artist’s tape.
All together, now….
Even my “epic fails” became useful 😉
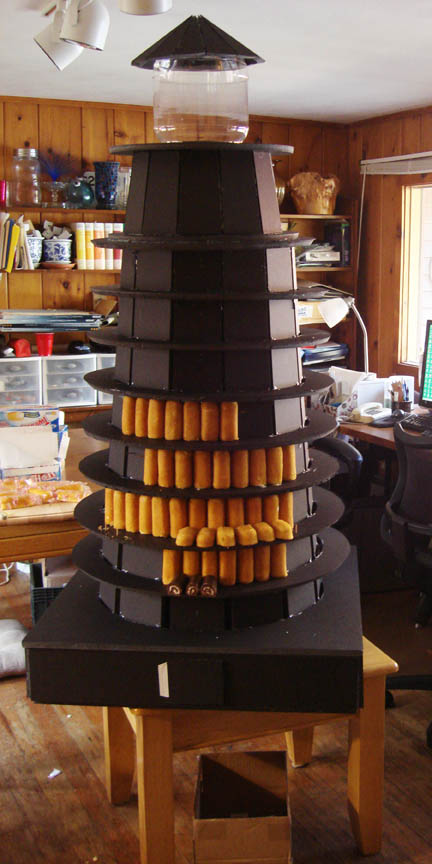
OK, whew! After some epic hot-gluing, (including turning the whole thing upside down and adding black duct tape and hot-glue support to the underside of the rings), it’s finally time to start laying Twinkies! The project up to this point took me 4 days–4 of my days, which are generally a series of interruptions, without the benefit of solid blocks of work time.
 a
a
As an “adhesive” I used the Twinkies’ own natural stickiness, (did I just use the words “Twinkie” and “natural” in the same sentence?) which clung to the foamcore quite well. As an added support, I cut toothpicks in half, poked the sharp end into the foamcore which easily went right through to the other layer of cardboard, and stopped there. That left about a half an inch of toothpick, the blunt end, on which to impale the Twinkies. A trick I found was to aim and poke a thumbtack (not a flat head but a sticky-outy one) where I wanted the toothpick to go. This created a hole for the toothpick to enter, without hurting my fingers or needing a thimble.
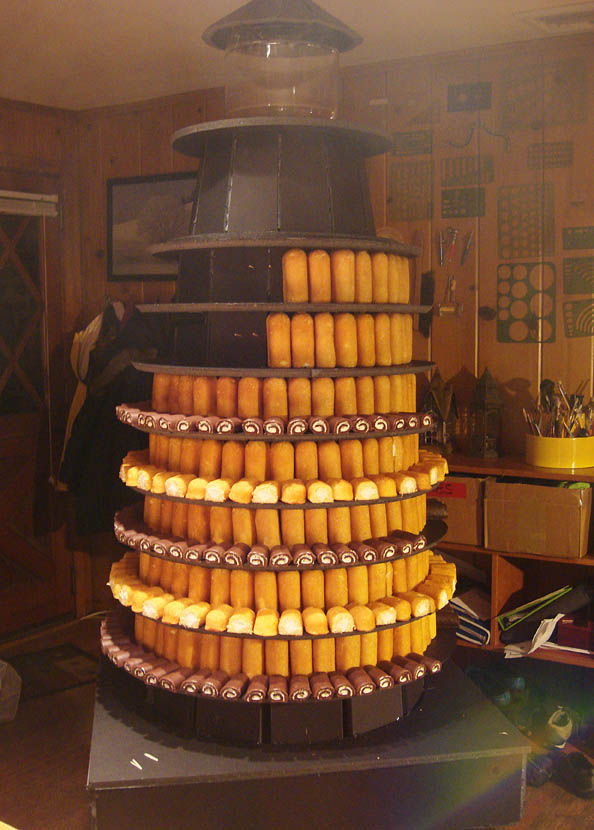
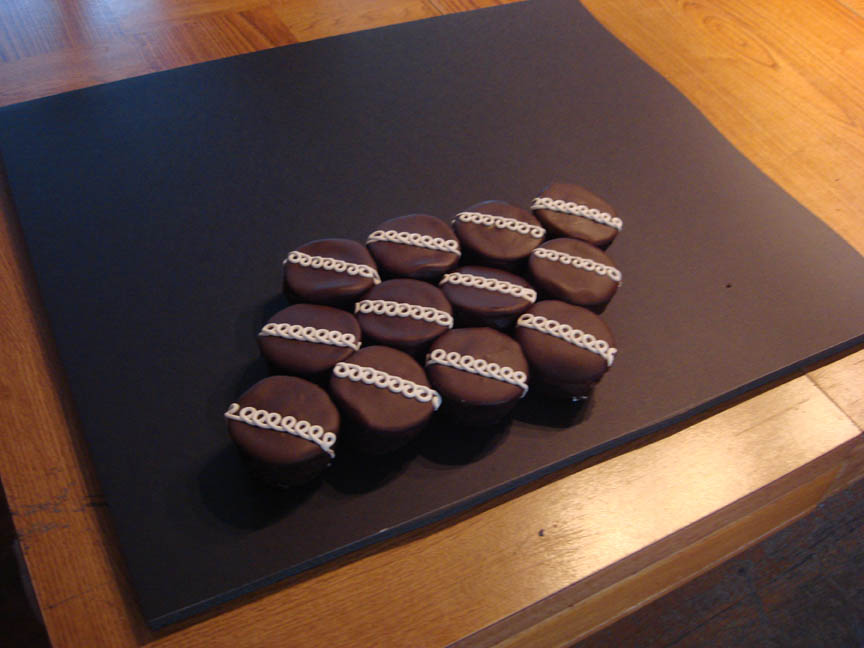
Rather than measure Twinkie placement, I started on one side and placed toothpicks and Twinkies side by side as I went, so they could snug up together to hold each other up. The outer layer of half-Twinkies and Ho-Ho’s was also intended to support the others. The horizontal half-Twinkies and Ho-Ho’s likewise were impaled on one half-toothpick. I cut about a half inch off each Ho-Ho to reveal the inner beauty of the rolled cake and icing, and be such a length as to cantilever out slightly beyond the edge of the shelf. Because of the parafin in the chocolate coating of the Ho-Ho’s, they did not have an innate stickiness to the foamcore surface. Therefore I put a squirt of canned chocolate icing (grease and sugar) under each one to adhere better.
I sliced off a bit of one rounded end of the Twinkie so that it would stand flat on its end and reduce the risk of wanting to roll around. The other rounded end I left intact, so it would act as a cushion when gently pushing the Twinkie into place and create a bit of a spring-tension effect.
The bottom box: We had to be able to grasp and carry this honker by the bottom, and I wanted to keep the look of snack-cake abundance. So I simply photographed a small group of cupcakes, Photoshopped it into a pattern, and printed out 9″ x 13″ sheets of “wrapping paper”, spray-gluing it into place.
 a
a
 a
a
The Cupcake section went fairly smoothly. I impaled them on two toothpicks each, and thankfully they weren’t so heavy as to squish the lower rows.
Then I continued with the Twinkie “vocabulary”, hiding as much foamcore as possible, and slicing off thin edges to make them fit nicely.
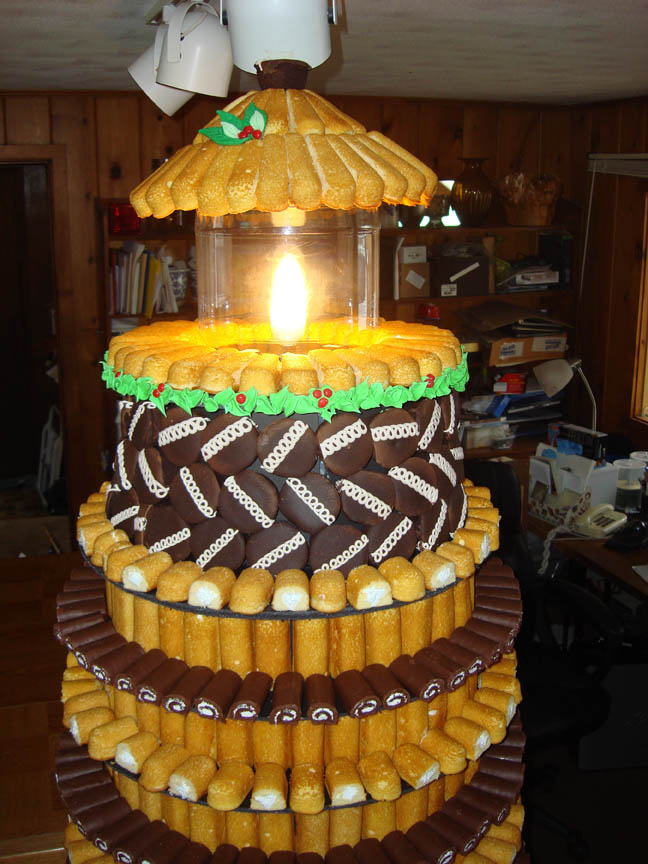
Nice! but needs a bit of holiday color. How about some royal icing greenery with cinnamon red-hot berries?
What’s not to love?
With neighbors coming to the rescue, it loaded easily into my mighty minivan. Only one hiccup on the drive down to Norwalk, when somebody cut me off, I braked hard and the top-heavy plastic jar plopped off. Only 3 Twinkies came off, and we stuck them right back on their toothpicks, no problem.
 a
a
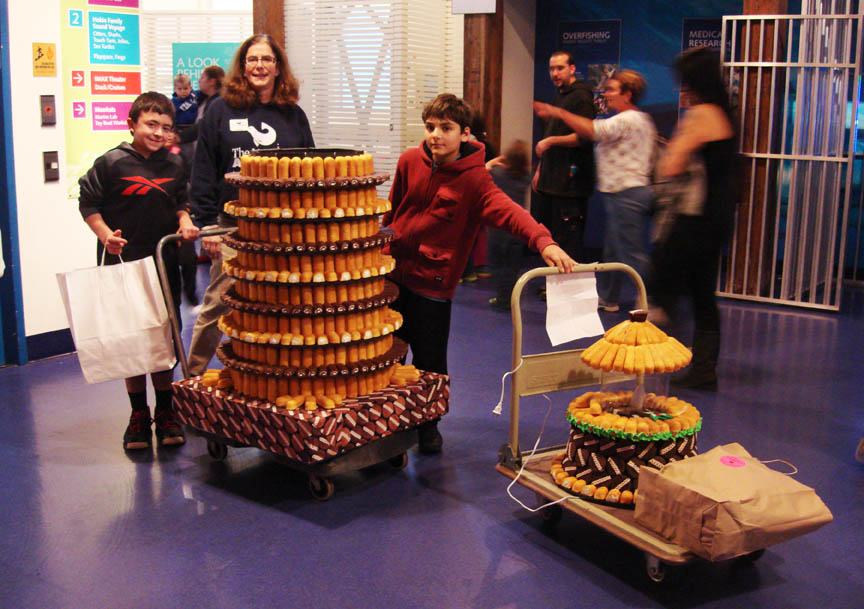
Delivery Day! Always an exciting day at the Maritime Aquarium.
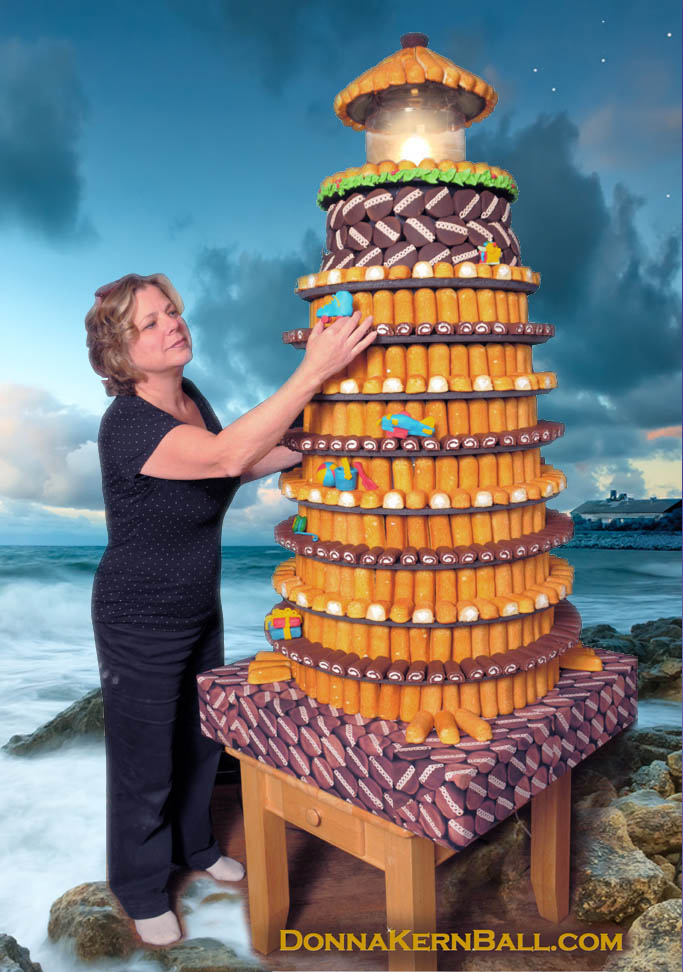
Finishing touches: To add a dash of color and interest, I had the last-minute idea to place fondant ornaments on the tiers. I’d never worked with fondant before, and was pleasantly surprised at what an amazing substance it is! Easy to work with, consistent, forgiving, and sturdy, (did I just describe the perfect husband?) I will have to dream up more uses for it in the future!
Was it worth it? It took me (one person) about 60 hours over a two-week period. It cost $150 in foamcore and $200 in snack cakes (I had emailed Hostess to ask if they would like to donate the 80 or so boxes of snack cakes. They replied that they were too busy making them, but graciously offered to feature it on their social media.) Compared to the cost and man-hours of my previous lighthouses, YES, this was much more do-able!
Did you enjoy this post? If so, please consider going back to my home page, to Buy My Books and download my children’s e-book, “ABC-What Would I Be?” to read to your small ones on your e-reader. I guarantee it’s well worth the $2.99!